Exploring The World…of Knitting!

The Wonderful World of Knitting…

20140127-124402.jpg
I was introduced to knitting by a friend quite a while ago using two needles. I remembered it being very tricky at first but it later became fun and even turned out to be one form of recreation or de-stressing for me =)

Would you be fascinated to know that there are various and fascinating ways to knit???!!! Oh, yes! I would! Absolutely! These are some of the ways I have knitted or at least tried to.

20140127-121804.jpg

You can knit using straight needles which come in different sizes.

This was my very first scarf I knitted using straight needles. It was just a garter stitch the whole length (which is just a knit stitch and no purl stitch).

20140127-121215.jpg

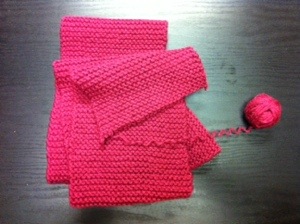
But…I just recently unraveled it and wound it back into a ball because I wanted to knit it into a different pattern. See, that’s one of the beauties of knitting…you can always redo what you started (or thought you finished). Although the process of unraveling, rewinding, and restarting again can be a…task. Hmmm… It’s the same way in life…Interesting, isn’t it? With some exemptions…=) I’m very grateful for second chances!

20140127-123729.jpg

These are circular needles.

The circular needles are recommended for knitting something longer past the capacity of the straight needles (ie. blankets, the length of a scarf), or just for things that go around and around like a beanie.

This was the very first beanie that I knitted using circular needles following a ribbed pattern.

20140127-123944.jpg

Hahaha, it looks like a bell!

20140127-124032.jpg

Now, it really does look like a bell, hahaha!

It also was unraveled and wound back into a ball.

And there are still so many other ways to knit! Now, I understand that knitting materials can be very costly but, good news!! You don’t really even need any needles or what-nots to knit except, of course, the yarn. If you can only afford yarns, that would be perfectly alright! If you have a pair of upper limbs you can still knit using your fingers or your arms!!! A wonderful way of exercise! Ah-mazinnnggg!!!

Presenting body knitting! 

Finger Knitting

20140127-213720.jpg

This is called finger knitting!

Since you can only use four of your fingers, the width of the scarf you’ll end up with would, obviously, be small. I prefer scarves that have wider widths. Maybe using all toes of your feet? But this process would take a while up to more than an hour and I could see the difficulty of getting around with feet bound up together so I don’t think that method will be successful!

20140127-214247.jpg

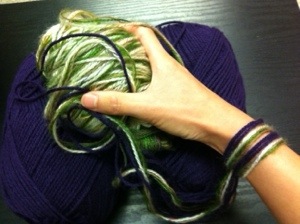
Now, this is arm knitting!

Arm Knitting

This has been my favorite way of knitting a scarf lately. I’ve just been recently introduced to this so I’m just a beginner. It’s wayyyy quicker than all other ways although it’s been taking me about an hour to complete one and I’ve heard you can finish a long scarf as short as 30 minutes!


20140127-214651.jpg

So, you just use both your arms as your needles! If you already know how to properly knit using the needles, arm knitting will be quite easy. Just think of your arms as the needles.

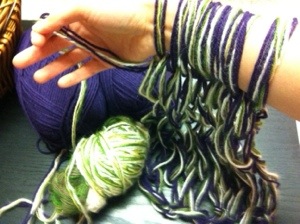
Unfortunately, I didn’t know how to take a picture of my two arms using my phone that’s why I could only take a picture of one of my arms, hahaha!

Since the arms are much bigger than any of the needles I’ve seen sold in the craft stores the holes are also bigger. But I like it and it’s quite nice!

Then, at the end! You can easily loop both edges together and make it into an infinity scarf.

20140127-214931.jpg

There are tons of YouTube videos about arm knitting and watching them would be easier to follow than me explaining the process =)…hahaha…

Here’s another scarf I arm knitted.

20140127-215112.jpg

From this…

20140127-215214.jpg

To This…


So many ways to explore the world…as knitting alone shows! Do not limit yourself! =)

Crunchy Nutty Fruity Oatmeal Waffle

This waffle is sooo yummm and healthy!!! It does not require flour but oats so those who are gluten-intolerant can still enjoy a waffle. The wonderful thing about making your own waffle is that you are free to modify and add just about anything you want in or on it.

20140123-174558.jpg

Fresh blueberries (frozen is ok too)…

20140123-175535.jpg

Sliced almonds (I prefer sliced to whole)…

Ingredients/directions:
1/4 C blueberries (fresh or frozen)
1/4 C pears (diced)
1 whole banana (sliced into pieces)
1/4 C walnuts or almonds
-> set these ingredients aside

2 C quick oats
1 1/2 to 2 C water or soy milk or almond milk
1/4 oil
1/3 honey or agave
->Blend the ingredients in a blender until smooth.

Then…
-> in a mixing bowl, add the blended mixture, nuts, and fruits together.
-> pour a cup into the waffle iron.
-> hopefully, your waffle maker has an indicator to let you know it’s cooked 😊👍, otherwise, I’m not quite sure how long it takes for it to be cooked. It’s not really recommended to keep opening the waffle iron because it will keep the waffle from being nicely formed. Hmmm…but I will time how long it takes to cook one next time!

20140123-174440.jpg

Then…you can spread nut butters, syrups, and/or additional fruits on top of your waffle.

IMG_1852                IMG_1851

Then finally, you can enjoy eating your healthy home-made waffle! 👏😊👍

Our Little Work Pet

This is our little pet fish at work–a nice dark blue and red colored Betta fish. He started out in our workplace as a Christmas white-elephant gift exchange which now graces our front office and keeps us sane, hahaha.

20140123-123943.jpg

Many facts I learned about this little fish. It originated in Southeast Asia in countries like Cambodia, Vietnam, Laos, Thailand living in shallow rice paddies, therefore, it can thrive in a little aquarium. It still likes to have places to hide itself in, ie. water plants, and it likes to be by itself. It is also called a Siamese Fighting Fish and was once prized by the King of Siam (now Thailand) where owning these fish once required licensing. The males are more vibrant and more attractive than the females. In the wild, the males’ fins are shorter making them less of a prey so you know it’s been bred for captivity if their fins are long and beautiful.

Interestingly, I found out that it is on high alert and in fighting mode if it starts fanning its fins more and, I guess, also when it’s blowing its face bigger. Hahaha, whenever I come very close to our fish bowl or place my face on top of his bowl and whistle I thought it just liked me since it does the above. I always thought he finds my company a delight only to know he is on high guard 😔😓…

Oh well, hahaha…something new added to my learning! 👍

ALSO…They can live from 2 to 4 years in captivity but it has been known to live up to 10 years. 😏…hmmm…perhaps I should release it back into the wild??? By the way, have you heard or seen the Black Fish documentary? Pretty interesting…

Anyway, more info about this beautiful fish here !

Sesame Noodles

This is such a quick, easy, and yummy noodle recipe! It made me go “mm-Mmm!” after doing a taste-test at the end. The sauce doesn’t seem like it would be enough and i was tempted to double the recipe but it sure is just enough. I got the recipe here .

20140115-164957.jpg

Ingredients
1/2 (8 ounce) package spaghetti noodles (I used wheat noodles)
2 tablespoons peanut butter
1 tablespoon honey
2 tablespoons tamari
1 teaspoon Thai chili sauce
1 teaspoon sesame oil
1 teaspoon ground ginger
1 clove garlic, minced
1 green onion, chopped
2 teaspoons sesame seeds

Directions:
Fill a large pot with water and bring to a boil over high heat. Once the water is boiling, stir in the spaghetti, and return to a boil. Cook the pasta uncovered, stirring occasionally, until the pasta is cooked but is still firm to the bite which takes about 10-12 minutes. Drain well in a colander set in the sink and run cold running water through for a minute.

***what I did differently: 😊
-I didn’t have tamari but I had Bragg’s liquid alaminos but soy sauce should just work in place of either one.
-I didn’t have the Thai chili sauce so I left that out.
-the directions said to melt the peanut butter in a microwave but instead of using a microwave, I mixed all the ingredients together (except the green onions) then poured it onto the noodles in a pan sitting on low/medium heat. I stirred until everything looked well mixed. Topped it with green onions and a little bit more of sesame seeds. Yum!

This New Year 2014

The weeks, days, hours, minutes, leading down to the last few seconds of 2013 got me very excited for reasons I do not fully know myself, hahaha! Call me a bit crazy but I’m just really excited because I cannot almost contain myself knowing that God has something wonderful planned ahead of me!!! And not just me but you and everyone else! I know that life on this earth will always have its humps and bumps but with God in the picture, I know He will make all the difference!

Call to Me, and I will answer you, and show you great and mighty things, which you do not know.
Jeremiah 33:3

We only have but two choices in this life: upward or downward, forward or backward, God in or out of our lives… but none in between.

This is an excerpt from a poem that I like:

Two roads diverged in a wood, and I —
I took the one less traveled by,
And that has made all the difference.

Frost, The Road Less Traveled

Which reminds me of these Bible verses:

Enter through the narrow gate. For wide is the gate and broad is the road that leads to destruction, and many enter through it. But small is the gate and narrow the road that leads to life, and only a few find it.
Matthew 7:13-14, NIV

Why not make the decision to have God in your life this year? He really has been so good to me I can personally tell you that. Invite God into your life and He will NEVER ever fail you– that’s a promise! I’ve had my share of difficulties and heartaches in 2013 BUT God has seen me through!

I invite you to “taste and see that the Lord is good” (Psalm 34:8) this year of 2014. You will not be disappointed 👍😊.

Happy, Happpyyy, HAPPPPYYYY New Year!!! 🎉 God is good! ❤

Soap making: my ultimate goal for year 2013

Yay, yay, yayyyy! Doesn’t it feel good to accomplish a goal you set before time ran out?! My ultimate goal for this year is to make soap and that I just did a few days before the turn of a new year!!!

Becoming more aware of the unnecessary and negative effects of the chemicals we allow our bodies to be exposed to, I’ve become more conscious not only in what I consume but also on what I apply externally on my skin. I just read somewhere that our skin absorbs approximately 60% of what we put on it! That is amazing!

So, I did quite a few researches here and there and read many of the ingredients that, generally, mass-produced soaps contain.

Initially, I wanted to make soap without lye after reading the toxicity of it. But then, after reading more about soap-making, I learned that no one will be able to make a good, hard soap without lye! Then, I remembered back in chemistry class: we used lye many times being known chemically as NaOH! Then, after chemical reactions the soap should just be ok…

Soap-making had me excited for a long time but never got around to making one BUT I did not want to break the promise I made to myself and so, I vowed to accomplish this goal before the year ended!

Initially, I wanted to make soap from scratch! Hahaha, down to making my own lye water! I lived in an apartment which had a wood stove. I could have used the wood ash to make lye but then I moved before I was able to do that. But then I thought I shouldn’t be too hard on myself considering I’ve never made soap before. I decided to start easy and experiment from there.

And so I learned that there are 3 ways to make soap: cold process, hot process, and melt-and-pour (which would include the rebatching method, I’d say). The easiest out of these 3 is the melt-and-pour method which I opted for.

I bought 12 pounds of soap bases and many other goodies from Bulkapothecary online. Waiting for the package to arrive made me very excited!

20131231-172424.jpg

But…my excitement left me for a bit…even when I finally received it… and it took four months for the excitement to come back and before I finally opened it!

I thought I’d receive an enormous block of hard soap that I would have to chisel off from little by little but they conveniently arrived in one-pound blocks!

20131231-172646.jpg

Then…off I went! The good thing about the melt-and-pour method is that if you don’t like how the soap turned out, you could re-melt it again and do it over.

So, here’s my very first soap!!!

20131231-173211.jpg

Well, let me back track. The supplies that are must-haves that I used were: a spatula, a little mixer (i found a cappuccino mixer at a Daiso store which only cost $1.50), digital scale, cutting board, a cheese cutter, essential oils (I had tea tree oil-my favorite, lemon-eucalyptus, jasmine), a pot, and a stove– although I could have really just used a microwave =\…

20131231-173636.jpg

Oooooohhh!! And don’t forget– a very, very important must-have: a container! Based on my researches, you don’t really need a fancy mold. You can be very creative! I used tofu containers that I’ve saved and it really molds really nicely and reusable!

20131231-173527.jpg

Look how the tofu container nicely molded the edges of this bar.

20131231-174813.jpg

So, here’s the rest of my first batch of soap!

20131231-174123.jpg

20131231-174154.jpg

I got a little bit too excited with this first experiment that I didn’t even follow any recipe and was just adding things here and there, hahaha! But I thought they came out good they look like they can be eaten especially the ones with oatmeal.

Here’s a jasmine bar with jasmine flowers.

20131231-174602.jpg

Then, I made more the next day then placed them in a box so they could be safe on the flight back home today✈😄.

20131231-174754.jpg

Mission accomplished! Happy new year to all! 🎉🎆God IS good! 😊👍

Anti-depression Kit

Yesterday, at work, one of my co-workers passed to everyone wrapped little packages. She said a lady came by our office and just handed them to her. We never were able to identify who she was. We all unwrapped our little suprises and these were some of the things our gifts included.

20131220-125333.jpg

It included an “anti-depression kit” which is funny and cute but really is very thoughtful. So, the “kit” included an eraser, a penny, a marble, an elastic, a string, and 2 kisses Hershey’s chocolates and this is what the note said…

An ERASER to make all those little mistakes disappear
A PENNY so you will never be completely broke
A MARBLE for those days when you are sure you’ve lost all yours
An ELASTIC to help you stretch beyond your current limits
A STRING to hold it all together when it seems to be falling apart
And a KISS and a HUG to remind you that someone cares about you

A good and positive way to look at life, wouldn’t you think?

BUT! There is a better way! 😊

1 Peter 5:7
Casting all your care upon Him, for He cares for you.

Philippians 4:6-7
Be anxious for NOTHING, but in everything by prayer and supplication, with thanksgiving, let your requests be made known to God; and the peace of God, which surpasses all understanding, will guard your hearts and minds through Christ Jesus.

Philippians 4:19
And my God shall supply ALL your need according to His riches in glory by Christ Jesus.

Kale Chips

I’m not much of a “chip-py” person and the chips i would usually eat are only some potato chips but mostly tortilla chips. Then, again, I’d only eat them mostly when it’s served at a gathering. Though I’d eat them at home too…when I remember them, hahaha…

BUT! Somebody offered me some kale chips one time and, to be courteous, I took and pop some in my mouth and, oh! Wow! It tasted quite yum! So, I thought of making some…and 2 years later I, finally, made a batch, hahahaha!!!

I thought a dehydrator is a requirement but, uh-uh, not really. A good, working oven would do the job! 👍

I bought a bag of pre-washed and pre-cut fresh kale from Trader Joe’s (on the bag was an instruction on how to make the kale chips).

But this is how i made mine:
-the oven was pre-heated to 200F.
-I placed the whole bag of kale in a mixing bowl. Added 2 Tbsp of olive oil and mixed together until all the kale had been covered. Then I added 2 Tbsp of nutritional yeast flakes and mixed everything together.

20131217-190542.jpg

-I placed the prepped kale onto a cookie sheet and baked at 200F for about 1 hr.

20131217-190712.jpg

***NOTE: next time I’d make sure to not place the kale multi-layered on the cookie sheet because this way took longer for them to turn into chips. 👌

20131217-190742.jpg

This was yummm and a healthy one too, wouldn’t you say? I liked eating it with raw cashew!

Jasmine Almondmilk Tea

One night, I wondered about how jasmine tea would be like but adding it into vanilla almond milk instead of just plain water. I have a bag of dried jasmine flowers I, initially, thought of making essential oils with, hahaha. But I realized after reading a little bit more about the essential oil making process, fresh and raw materials are best! So, since I won’t be using it for oil-making anymore, I decided to make use of it by consumption!

Anyway, so I have this little herb infuser mug I took away from my parents 👍which worked so well for this experiment, yay!!!

20131205-224618.jpg

I placed about 2 spoonfuls of dried jasmine flowers. Then, I boiled the vanilla almond milk (store bought) then filled the mug until it was almost to the brim.

20131205-224835.jpg

I let it seep for about 10 minutes and wondered how it would taste like but…Mmm-Mmm!!! It turned out to be a nice experiment (at least for me). It was actually pretty good!

I kept the herb in the mug but I left the mug out overnight and when I tried reusing it the next day with freshly boiled almond milk it was still ok although it kinda had that little bitter after taste and I wasn’t sure if it was from the jasmine or almond milk or the vanilla in the milk. But all in all, I still liked it.

Then, I wanted to make a bigger batch but i don’t have bigger infuser mug but good thing I have a cheesecloth which I used to wrap the jasmine flowers with. I dunked it in a pot of vanilla almond milk and left it there ’til it boiled.

20131205-225748.jpg

Next time, it would probably be good to keep the cheesecloth with the herbs in the fridge for future usage again to avoid bitterness. But then, again, perhaps that’s just how vanilla almond milk taste like boiled…hmmm 😉😁…

Delicate Pink Rose

I went to visit a friend and saw in her rose garden this beautiful rose which also had the most wonderful fragrance which quickly turned to be my favorite flower! I could have just sat there for a moment…no! I would say, two moments and more just to savor smelling this rose and adoring it’s beauty…

20131118-123145.jpg
Such a beautiful creation in various ways and so delicate…

20131118-123350.jpg

20131118-123557.jpg
It’s almost like a painting…

20131118-123622.jpg

20131118-123755.jpg

20131118-123834.jpg

20131118-124624.jpg

20131118-124643.jpg
Sad…it will soon fade BUT there is one thing that will never fade!!!

Isaiah 40:8
The grass withereth, the flower fadeth: but the word of our God shall stand for ever.